Setting Up Interior Maps
Configure an interior map taking advantage of the advanced features of the IdealTwin_Interior. This configuration will allow to switch between a first-person view and an orbital view from above, using elements such as the CuttingVolumeScene to visualize the structure from different angles. We will also add a minimap to locate the player and set up the VariantManager both to customize the environment and to have the configuration variants applied on the unit.
GameMode Indoor Configuration
To ensure that the map has the necessary features for an indoor virtual tour, you first need to assign the GameMode correct, which in this case will be GM_ITw_Interior. This game mode provides the key functionalities already preconfigured, such as camera operation, interaction system and other aspects of interior mapping.
Steps to Configure Game Mode
Open the map.
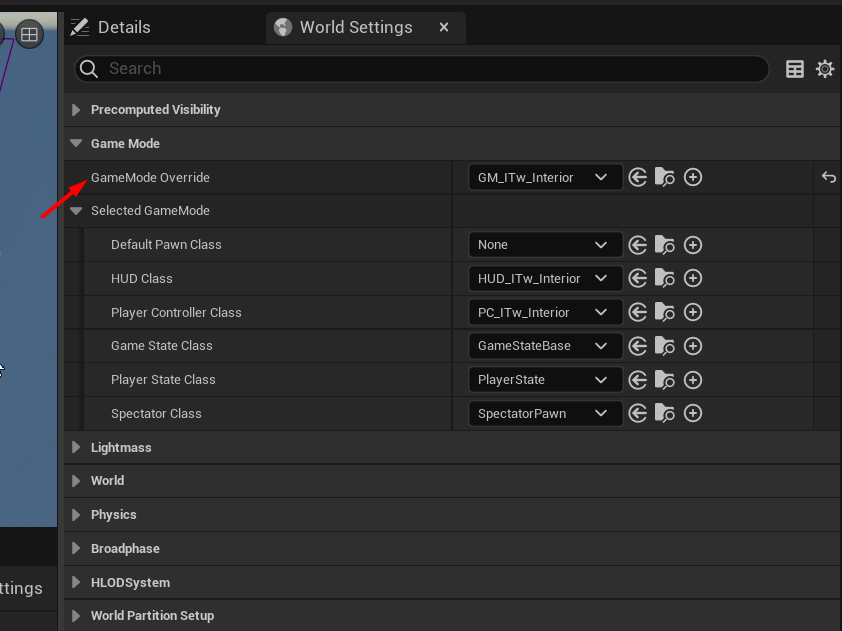
In the Details Panel of the level, select the section World Settings.
Search for the option Game Mode Override and select
GM_ITw_Interiorfrom the drop-down list.Saves the map changes.
With this configuration, the map will use the predefined functionalities in GM_ITw_Interiorfacilitating the creation of the interior route.
Positioning Pawns for Inner Tour and Orbital View
To offer two perspectives in the tour, one in first person and the other orbital from above, we will use the pawns. IdealTwin_Walk for the inside view and IdealTwin_Orbital for the aerial view. This will allow switching between a first-person scanning perspective and an elevated view.
Steps to Configure Pawns
These classes can be found in the Place Actor within the category of IdealTwin.
To place the actor, open the Place Actors in the category of IdealTwin drags a
IdealTwinOrbitalCharacterto the level.In the same panel drag a
IdealTwinWalkCharacterto the level.Configure
IdealTwinWalkCharacterfor first-person exploration:Sets its initial position at the starting point of the inner path.
Place
IdealTwinOrbitalCharacterin an elevated position, to obtain an aerial view of the house.
When running the map, the PlayerController provided by the plugin carries out a selection process of pawns for possession. First, the controller will attempt to locate a pawn containing the tag walkwhich usually indicates a walking oriented movement style. If you do not find a pawn with this tag, then it will look for one that has the tag orbitalcharacteristic of circular or fixed-camera movements. In this way, the PlayerController ensures the possession of the pawn The most appropriate tag according to the tags available on the map, allowing the player to take control of the map at the beginning of the execution.
CuttingSectionScene Placement
The CuttingSectionScene is essential to create a "cut-away" view allowing the user to see the interior from a perspective where certain walls or floors do not obstruct the view of the space layout.
To place the actor, open the Place Actors in the category of IdealTwin drags a
CuttingVolumeSceneto the level.Position it so that it covers the area you want to trim and for the volume dimensions do it from the parameter of Extend Cutting Box.
Use the scale of the actor instead of the variable of Extend Cutting Box can cause problems when visualizing the slice, so it is always recommended to use the variable to manipulate the volume scale.
The next step would be to apply the opacity modifier to the materials that will be in contact with the volume, because if the materials do not contain this modifier in the base material it will not have the desired effect.
For complete information: Secciones de Corte
Place Minimap Capture
To help the user navigate the space, we will set up a mini-map that shows the current position of the IdealTwin_Walk on the route. This will be achieved by capturing the map using a ScreenCapture that links to a UI widget.
To place the actor, open the Place Actors in the category of IdealTwin drags a
MinimapCaptureSceneto the level.Center it taking into account where the reference point will be.
Add to Pawn the component of MinimapElementComponent with the tag Player.
Any actor can be added on the minimap using components and identifiers explained in the minimap section.
Setting the LevelVariantSetActor for the web configurator
In order to allow customization of the environment during the tour, we will use the VariantManager. This makes it easy to change features such as wall materials, furniture, or decoration in real time. To make synchronization with the web possible, a class has been prepared that can read data from the web and manage the variant within the level.
To place the actor, open the Place Actors in the category of IdealTwin drags a
IdealTwinLevelVariantSetActorto the level.Assign the resources to be used in the level. In case it is not configured see complete information below.
For complete information: Configurador con Variant